
OSCP Exam Guide: Preparing and Passing
Table of Contents
- Introduction
- Experience
- Pre-OSCP
- PWK Labs
- Post-Labs
- Exam
- Conclusion
- Pay It Forward – PWK Vouchers
- Resources
Introduction
So you are planning to pursue the Offensive Security Certified Professional (OSCP) certification and are thinking about starting the Penetration Testing with Kali Linux (PWK) labs. This post covers some additional OSCP preparation that you can do before and after taking the PWK labs. It includes various tips that I used on how to prepare for and pass the OSCP. These tips are categorised into the following sections: pre-OSCP, PWK labs, post-labs, and exam. Links to useful resources are also provided for each section towards the end of the guide. Some of the tips provided in the pre-OSCP section may also apply to the PWK labs section. One key tip that applies to every stage of your preparation is backups. Things can go wrong and you could end up losing all your progress so ensure that you regularly back up your data.

Experience
Depending on your experience, you may approach your OSCP preparation differently. I come from a system administration and cybersecurity research background and so I had a good foundation in cybersecurity before pursuing the OSCP. I also had experience in networking, programming and administering Linux and Windows servers. While I met the OSCP prerequisites, I decided to do some OSCP preparation during the pre-OSCP stage, which helped me develop a penetration testing methodology.
Pre-OSCP
Pre-OSCP preparation will help you develop your methodology before you take on the PWK labs. As a result, you will spend less time figuring out what combination of tools to use to attack a specific application or service. This will also save you some lab time if you are taking the 30/60/90-day lab options (Offensive Security has released a 365-day lab option, which will give you more time to complete the labs than the previous options). Below are some tips for your pre-OSCP preparation:
- Develop your methodology: the methodology that you use will determine what steps you take when approaching a new target. These steps will include what tools you use, the order in which you run them, what vulnerabilities you look for and how you exploit them. You should also create your own “cheat sheet” of commands and tools that you often use, which you can use on future machines. HackTricks is a useful resource for looking up a new service that you have never encountered before, which can be added to your methodology.
- Document what you have learnt: whenever you learn something new from completing a machine like a new tool or exploitation technique, document this as this will improve your methodology.
- Learn both manual and automated enumeration: learning to use a tool for automated enumeration like Autorecon will save you time in the exam, but make sure that you understand what it is doing. For example, Autorecon outputs commands that can be run manually. Learning to run these enumeration commands manually will be useful when automated enumeration misses something.
- Don’t exclude UDP scans: while many vulnerabilities may be found in services running over TCP, there may also be services running over UDP that contain vulnerabilities.
- Do the OSCP-like machines from TJ Null’s list: this list will help you get a feel for what to expect in the PWK labs. The machines that I completed from this list were from Vulnhub and Hack the Box, but the latest list also includes machines from Proving Grounds Practice.
- Learn from IppSec’s methodology: when doing the OSCP-like Hack the Box machines from TJ Null’s list and are stuck on a machine or have completed it, there is always something useful to learn by watching IppSec’s videos which will help you improve your methodology.
- View alternative solutions of the machines you complete: after rooting a machine, look at the write-ups of others who may have completed the same machine using different attack vectors. You can then update your methodology with these additional attack vectors. I found the write-ups of 0xdf hacks stuff to be a great resource for learning attack vectors that were not the intended path.
- Practice buffer overflows: while buffer overflows are already covered in the PWK course materials, there are some free resources (see Pre-OSCP Resources) that can help you understand this area. Additionally, you should create your own buffer overflow template which will be useful in the exam.
- Create a folder containing static binaries, scripts, and pre-compiled exploits: this will save you time by having all these files in one central location which can be transferred to your targets.
- Create a spreadsheet of working exploits: after successfully running an exploit against a machine, record this in a spreadsheet with columns such as Exploit DB ID, CVE number, exploit path on the local file system, etc. This will save you time in the future should you come across a machine that is vulnerable to the same exploit.
- Always upgrade to a fully interactive shell: some exploits may not work unless you have a fully interactive shell.
- Practice privilege escalation: this is an important area to learn – you need to understand what is ‘normal’ on a Windows or Linux system and anything odd will stand out. While there are many automated tools for privilege escalation, it helps to understand how to do things manually as the automated tools will not find every privilege escalation vector.
PWK Labs
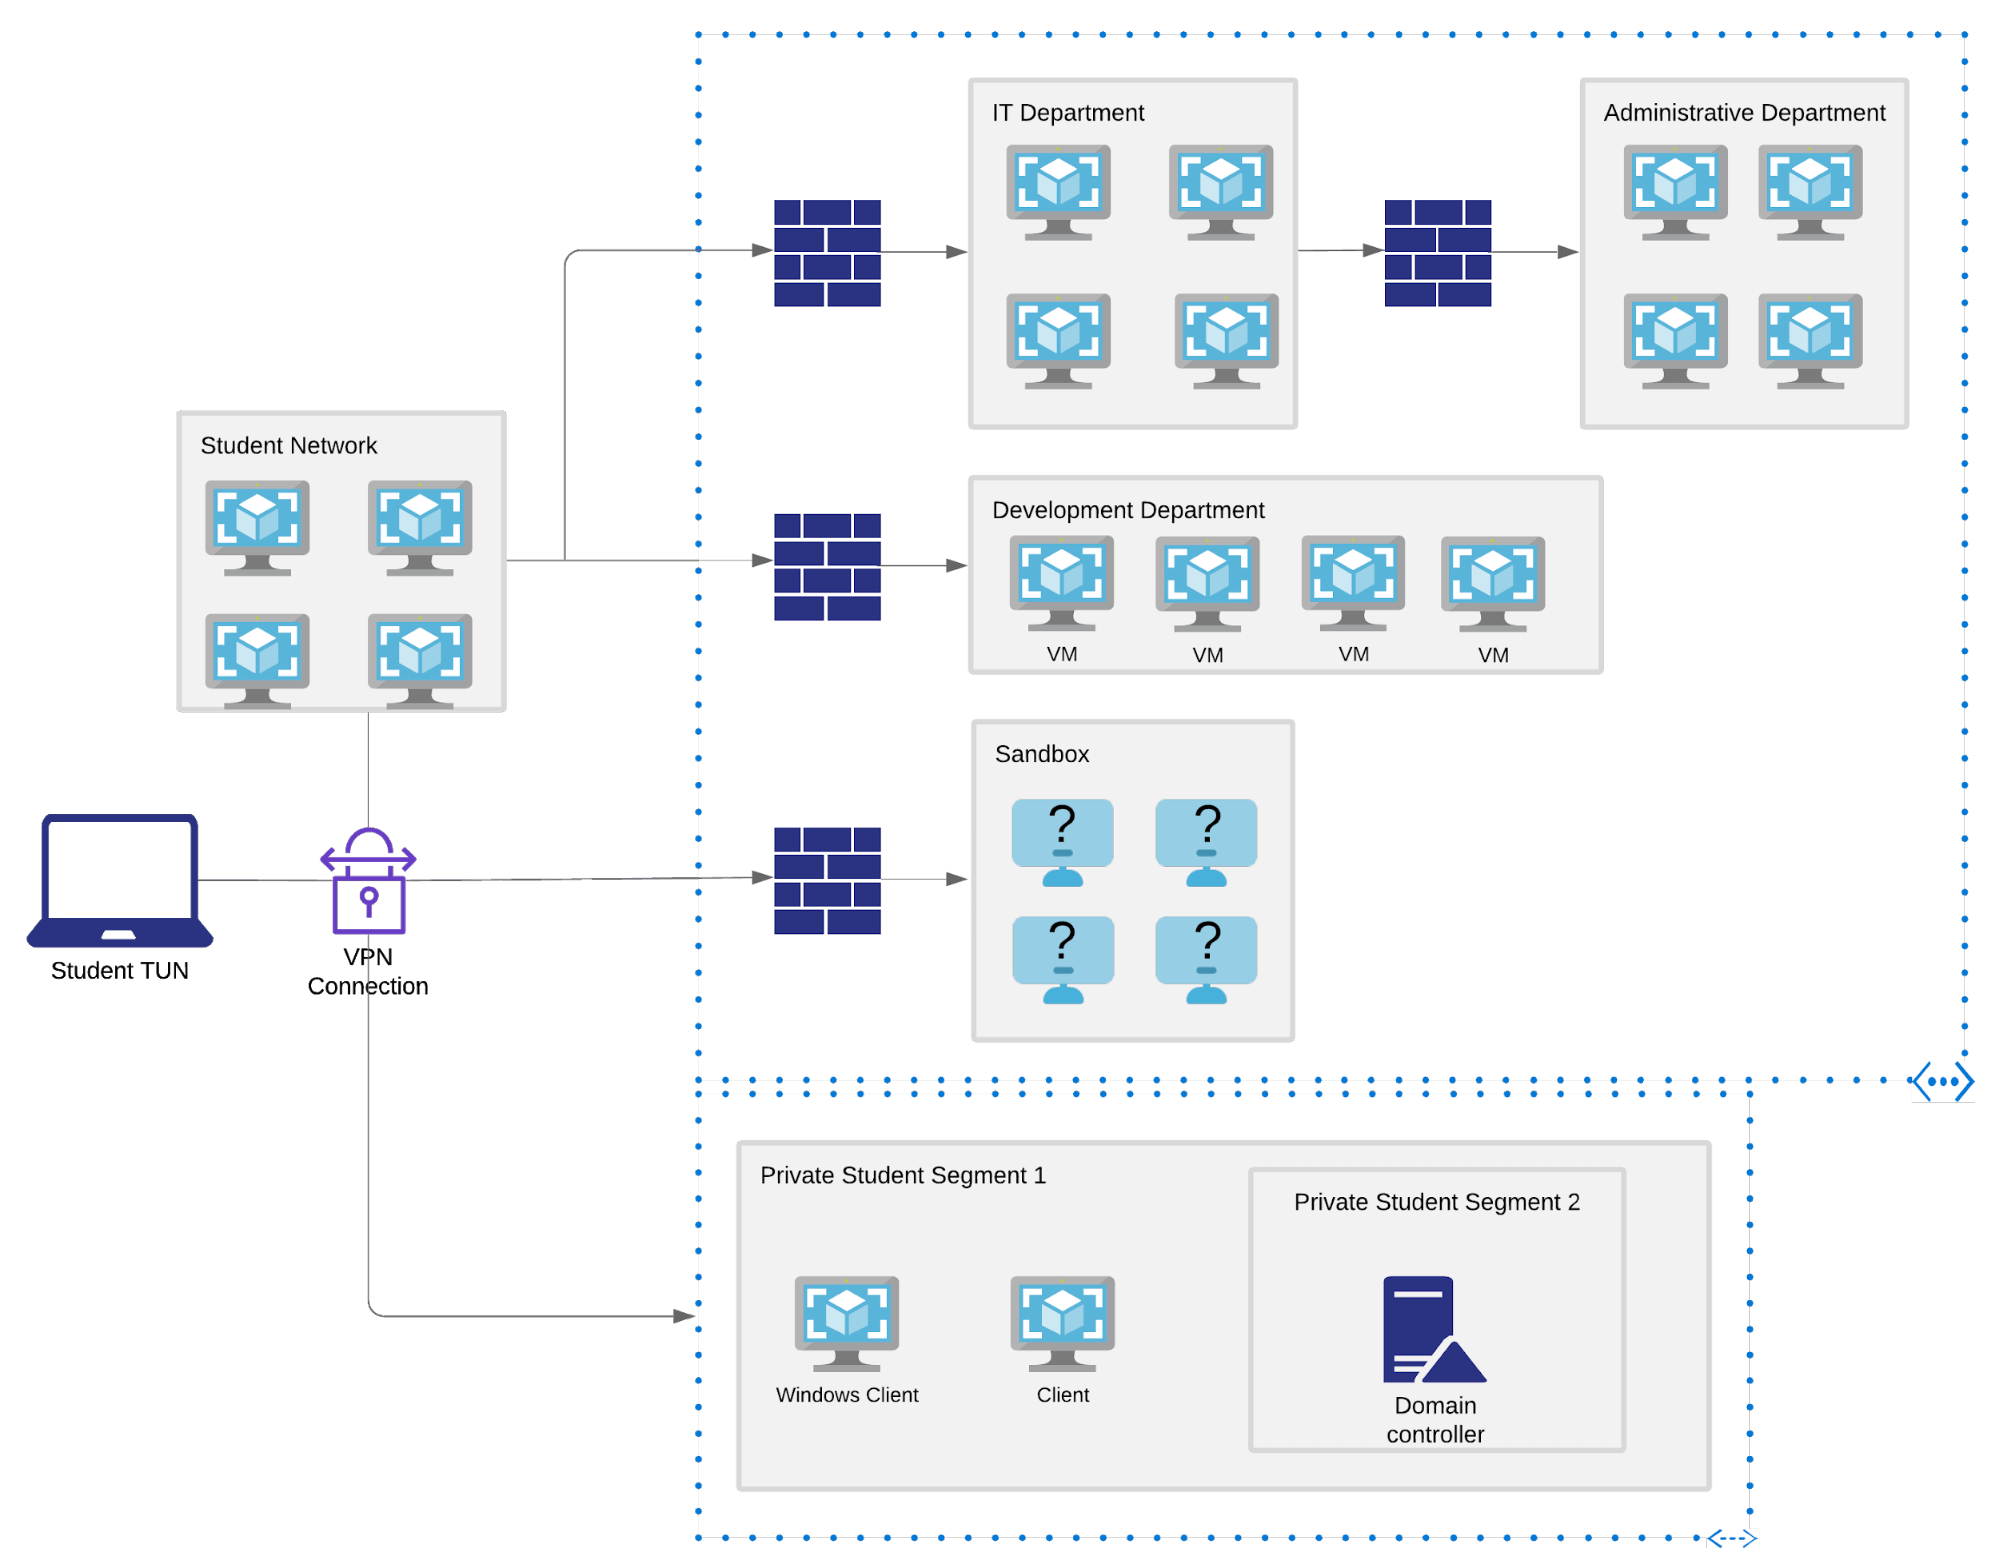
The PWK labs are where you should be spending most of your time preparing for the OSCP exam. The PWK labs were created by Offensive Security to mimic a real corporate network and contain many interdependencies between various machines. Spending your time in the PWK labs while documenting what you have learnt from each machine will better prepare you for the OSCP exam. Here are some tips for doing the PWK labs:
- Back up your course materials: this is important as should you lose your course materials, you will be charged to obtain another copy.
- Choose a strategy for doing the course materials: the PDF and videos cover the same material so you can choose to do one of them if you are pressed for time or both.
- Document the exercises and 10 lab machines for 5 points: while this will consume part of the lab time, it will save you if you are sitting on 65 points for the exam.
- Document new techniques that you learn from each lab machine: this includes lessons learnt from each machine, notes on tools, exploits and privilege escalation techniques. This will serve as a future reference to come back to when attacking other machines and will improve your methodology.
- Complete the PWK labs learning path: this learning path is a good place to start with the labs if you are not sure where to begin. Try completing the machines first before looking at the machine details on the PWK labs learning path page. Additionally, there are excellent walkthroughs available for the Alpha and Beta machines which can help you improve your methodology.
- Identify if an exploit applies to your target by looking at the exploit preconditions: some exploits may have certain preconditions that must be met before the exploit can work. You can find these preconditions by reading the exploit author notes in the exploit as well as using the National Vulnerability Database to read the exploit description.
- Practice manual exploitation in the labs: while Metasploit is encouraged in the labs for learning purposes, you are only allowed to use it on one machine in the exam. Practicing manual exploitation will go a long way in improving how you read, understand and modify public exploit code.
- Try to understand exploit code before running it: you may find a matching exploit for a specific service and want to run the exploit right away. A better approach would be to get a high-level understanding of what the code is doing as this will help you identify which parts of the code need to be modified if required.
- Use Metasploit to verify a vulnerability if stuck on a machine: if you are stuck on a machine, use Metasploit to verify the vulnerability then try to understand what the Metasploit exploit code is doing and try to do it manually.
- Use hints if you have exhausted all avenues from your methodology: while there are hints available on the Offensive Security forums, using the hints frequently will take away from the learning experience plus there are no hints in the exam. Offensive security is trying to teach you the hacking mindset that is needed to take on any target no matter how unique it is.
- Don’t rely on a single tool: there are cases where a tool may not work on a target such as a payload generated by mfsvenom or a file transfer method. Instead, learn to use more than one tool so that you have alternative tools to use in case the other fails.
- Use kernel exploits as a last resort: there are a variety of privilege escalation vectors in the lab machines which offer a great learning experience and will be beneficial to know for the exam. Rooting a machine using a kernel exploit should be done as a last resort after you have tried other privilege escalation vectors.
- Perform thorough post-exploitation: some lab machines may contain credentials, password hashes or other artefacts that will be needed to access another machine in the labs. Some machines that you compromise may also be used to pivot to other internal networks.
- Keep a list of all usernames, passwords and hashes found in the labs: these will be useful later to gain access to certain machines in the PWK labs.
Post-Labs
At this point, you may have completed all the lab machines or your lab time has run out. You may choose to extend your lab access or schedule your exam. A good indicator of being ready to take the exam is when you can complete machines without having to look at the hints too often. If you have scheduled your exam, there is some extra practice that you can do to further improve your methodology using platforms like Hack the Box, Proving Grounds Practice and TryHackMe. I used Proving Grounds Practice and found it to be good practice for the exam. I also used TryHackMe as it has some buffer overflow rooms (see Post-Labs Resources) which can provide extra practice. Below are some tips that I found useful during the post-labs stage:
- Book an exam start time where you are most productive: I chose to start my exam at 7 am.
- Identify your weak areas to improve on: after completing various lab machines, you should have an idea of what your strengths and weaknesses are. Do you find it hard getting an initial foothold? You may need to work on your enumeration or exploitation steps. Do you find it hard to escalate privileges? Then focus on privilege escalation.
- Look for common themes in the lab machines that you completed: review your notes containing all the lab machines that you did and look for common themes in terms of what exploits and privilege escalation vectors were used. This will help you prepare for the exam.
- Complete machines from Proving Grounds Practice: I found Proving Grounds Practice machines to be good practice for the exams as they were similar to the PWK lab machines and contained interesting privilege escalation vectors. There also some retired exam machines that are included in Proving Grounds Practice.
- Do a mock exam: this will better prepare you for the exam and will allow you to practice pacing yourself and taking breaks during the 24 hours. If you still have access to the PWK labs then pick four machines and one buffer overflow machine and try to complete the five machines within 24 hours. You can also pick machines from Proving Grounds Practice, where each machine has an assigned difficulty (by the machine author and community) and is rated by points e.g. 25, 20 and 10. This can be used as a guide when selecting four machines for the mock exam.
Exam

Your exam date is fast approaching and you are wondering if there is anything more you can do to help you pass the exam. While most of your preparation for the exam was done in the pre-OSCP, PWK labs and post-labs stages, this section includes some important tips that will help you reduce the pressure on exam day. Here are the tips that will help you on the exam:
- Test out the proctoring software in advance: you can send a request to Offensive Security to test the proctoring software before your exam day. By doing this in advance, you can identify potential issues with your setup that you can rectify and prevent these issues from taking up your exam time.
- Read the OSCP exam guide: this is very important as the exam guide contains a lot of important information that indicates what must be included in the report and other important rules that must be adhered to in order to pass the exam.
- Prepare your exam report template in advance: fill in the sections that won’t change – this will save you some time as you won’t need to do this during the exam.
- Enable terminal logging: this will be useful when you are writing your report in case you forget an important command which could mean the difference between a pass and a fail. Terminator is a good program that supports logging.
- Update searchsploit: this will ensure that your local exploit database is up to date with the latest exploits.
- Perform manual enumeration: automated enumeration tools can miss some open ports – running a full port scan manually will help you verify this.
- Perform HTTP(S) enumeration last: compared to other services, the HTTP(S) service covers a large area for enumeration and so one should look for low-hanging fruit in other services before enumerating HTTP(S).
- Set a time limit to avoid rabbit holes: spend 30 minutes max on each port to avoid rabbit holes – if you don’t make any progress on port X after this time limit, move to another port. Return to port X after trying the other ports.
- Set a time limit on each machine: set a 2-hour timer to work on each machine. If after 2 hours you are still stuck on the machine, move to another machine.
- Take frequent breaks: you should be taking frequent breaks e.g. 15-minute breaks every 1-2 hours or when you make an important breakthrough in a machine. Although this is a 24-hour exam, you should also get some sleep.
- Document what you tried and why it didn’t work: this will allow you to keep a log of the different things you tried that didn’t work. This will prevent you from retrying the same technique repeatably and will make it easier to think of possible alternative techniques to try.
- Once you have enough points to pass, focus on the report: ensure that you have not left out any steps by replicating each step in your report against the exam machines. It is also important to start your report before ending your exam time. This is because if you end your exam earlier, the 24-hours for the report will start from that point onwards.
Conclusion
This guide covered tips that I used to prepare for and pass the OSCP. The tips that were discussed covered each stage of my OSCP journey: pre-OSCP, PWK labs, post-labs and exam. Passing the OSCP exam is not an easy task and requires a lot of time and preparation to pass the exam. Doing some extra preparation before and after the PWK labs can help you develop and improve your penetration testing methodology, which will assist with taking the exam. The last section includes resources that I found useful when preparing for the OSCP. I hope that this guide will help you on your journey to become an OSCP.

Pay It Forward – PWK Vouchers
Now you know how to pass, but did you know that Hack South is giving away 10 PWK vouchers? Check out this blog to know more.
Resources
Pre-OSCP Resources
- Methodology:
- Note taking:
- Autorecon: automated enumeration
- OSCP-like machines:
- Buffer overflow:
- Msfvenom Reverse Shell Payload Cheatsheet (with & without Meterpreter): good resource for generating non-meterpreter payloads (useful for exam)
- Privilege escalation:
- Windows Privilege Escalation Fundamentals (FuzzySecurity)
- Basic Linux Privilege Escalation (g0tmi1k)
- Privilege escalation workshop (Sagi Shahar)
- Windows Privilege escalation course (Tib3rius)
- Linux Privilege escalation course (Tib3rius)
- Windows privilege escalation checklists:
- Linux privilege escalation checklists:
- Windows privilege escalation tools:
- WinPEAS
- WinPEAS.bat: works on Windows machines that do not support .NET 4
- Linux privilege escalation tools:
- Linux Smart Enumeration
- LinPEAS
- LinEnum: works on older versions of Linux
- GTFOBins: useful resource for Linux privilege escalation
- Upgrading to fully-interactive shell
PWK Labs Resources
- PWK Labs Learning Path
- National Vulnerability Database
- Post-exploitation:
- Offensive Security Forums
- Offensive Security Community Chat
Post-Labs Resources
- Offensive Security Proving Grounds Practice
- Buffer overflow: